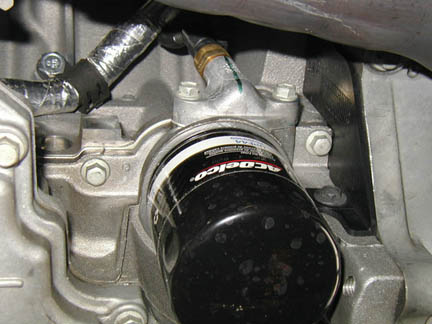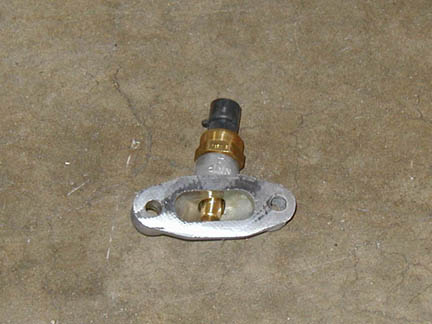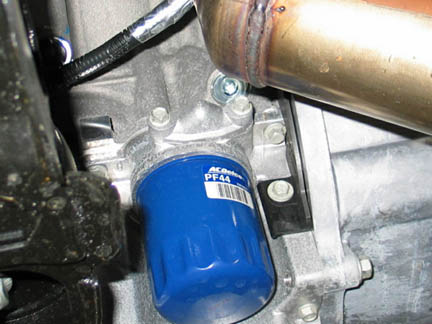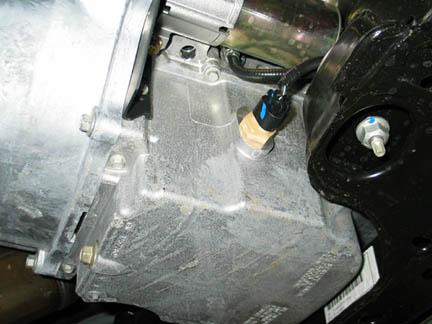

How/can I install and Oil cooler?Here are instcuctions for a Z06 corvette which should be very similar to the CTS-VIf anyone completes this install, take pictures and note the differences and then e-mail me the reuslts! Taken from here: http://www.z06vette.com/forums/showthread.php?t=16686 After a lot of research, I decided to go with a DRM oil cooler. DRM makes a couple different types, including stand-alone coolers and integrated race radiator / oil coolers. Because I don’t have water temps problems on track and the more complicated install, I went with one of their stand-alone coolers. They make a “standard” kit that relocates the oil filter. And they make a kit with a special oil adapter that fits on the side of the block, above the oil filter. This adapter attaches to oil in/out ports that are already on the block. These oil ports are actually used for a factory oil cooler when the LS1 is used in some truck applications. Wheel-to-wheel, Inc. also makes a similar adapter. I went with the “special adapter” DRM kit. It’s a nice setup: simple, straight forward install, the kit comes with -AN fittings, SS braided lines and requires drilling only 3 bolt-holes, nothing else is cut or modified. Price is $550. Took 1.5 weeks for delivery after order.
Track Temps
Street Temps After driving for a few weeks with this setup, the covers are more of a hassle than I thought and waiting for the oil to heat up (even on track!) is a pain. So you may want to look at the thermostat solution... A few companies make good oil thermostats that can easily be installed: Mocal / Tstat page - available from Pegasus Racing. Canton - recommended by DRM, looks like a nice unit. DRM indicated they can put together a kit which includes a t-stat. An integrated radiator/oil cooler would not have this problem. Oil pressure (Stock // With cooler):Idle: 39psi // 36psi 65mph, 6th gear: 49psi // 47psi Hard street driving: 60-65psi // 60-62psi Your results will vary – the point is it’s a very small drop in oil pressure. Install Time Actual cooler install time is ~4 hours (I work slow). But plan on a full day including planning, car prep, check-out/test drives, and making the radiator cover. I had access to a portable lift, which made things easier, but with good, tall jack-stands, install should be just as straightforward. The Kit Four parts: oil cooler, oil adapter, 2 oil lines – couldn’t be simpler:  Extra stuff I bought: I wasn’t happy using the stock bolts to mount the adapter unit – not long enough. They might have worked, but because the DRM adapter is thicker than the stock piece, there weren’t many threads left to work with. I got 2 new bolts (M6x40 Pitch 1.0) and lock washers. I also got some heat wrap - for use on the oil lines for thermal and abrasion protection, some tie wraps, and materials to block off the cooler radiator (see install steps).  Install Steps*** Standard disclaimers apply. I assume no responsibility for any damage. Please be careful – the consequences of a mistake or improper install would be extremely disastrous ***I’ve provided a lot of detail in the steps below, and some overly-cautious warnings - much of what I’ve written is obvious – but I was on a roll… Instructions, pictures, torque specs are for a ’02 Z06 – there may or may not be some differences with other C5s. 1) Start an oil change Meaning start how you normally start an oil change. Raise car, drain oil, drop filter. It takes a while for the filter to stop dripping oil. 2) Remove oil port cover Disconnect oil temp sensor harness (unclip with finger). Remove cover – minimal torque is required. Just a tiny bit of oil came out from cover. Remove gasket.   3) Swap oil temp sensor Remove from stock piece, install into DRM piece. Torque spec for sensor: 17 lb-ft  4) Route lines I started right behind the stock radiator and fed the hoses back toward oil filter – between block and motor mounts, closer to block then exhaust manifold. And then forward into stock radiator area, through a hole on the drivers side of the stock radiator. Nothing is cut or removed. I heat wrapped the lines anywhere they were close to exhaust or routed through tight openings.       5) Attach lines to adapter Sealer or tape is not required nor recommended (from DRM). Torque AN fittings with firm pressure and to a firm stop… no need to try to twist the connector off the hose! Angle the top hose as shown, this keeps the hose away from grounding straps on the block, at the top of this area. I routed the top oil line over a wiring harness running through the top area, this caused the least amount of bending of wiring and oil lines. Route / push the adapter into place, but don’t attach bolts yet - the oil lines will be moving around during cooler radiator install and you don’t want to put unnecessary stress on the attached adapter.   6) Pre-fill cooler radiator I used a $5 Pepboys hand pump - worked perfectly… these are more commonly used for filling diffs and trannys. A small funnel would work too. For the hand pump, the only trick is to fill slowly… half pump, wait 3 seconds, half pump, wait… I pre-filled only the radiator, not the lines.  7) Attach lines to cooler radiator (Boxes of oil make a handy work table.)  8) Remove center plastic “ground scrapper” piece To allow holes to be drilled for radiator. Remove two side bolts, loosen two center bolts. Pull piece forward. 9) Mount cooler radiator The cooler radiator mounting plate fits behind the black metal cross bar. The cooler radiator will be angled back (like the stock radiator). There will be a gap between oil cooler radiator and stock radiator (the ac condenser actually).Position cooler radiator in the center (from DRM) and drill three 1/4” holes. This is a little tricky, as you have to drill from the front of the car rearward. You cant drilling toward the front of the car, the frame is in the way. But, the radiator mounting plate is behind the bar you need to drill. I eyeballed it and it worked fine. A standard drill works perfectly. Secure with supplied bolts. Reattach plastic scraper. With the radiator installed, the rotation of the scraper is limited a little, but it’s not too bad. The scraper could be trimmed if required.   10) Mount Oil Adapter Finally, mount the oil adapter. I reused the stock gasket. Very carefully thread the bolts. Thread them with your fingers a good amount before using a wrench. A mistake here would be very, very bad. Torque spec is: 106 lb-in (that’s inches)  11) Check lines routing, tie wrap and heat wrap as appropriate  12) “Finish” oil change Install drain plug, oil filter, add oil, wait the appropriate time for oil to get into the pan. It took a little under 7 quarts to bring my car to the full mark (cooler radiator and oil filter pre-filled).  13) Cross your fingers and start the car I had someone lie down in front of the (raised) car and watch for any obvious leaks, and I started the car. Oil pressure started climbing in 2-3 seconds… about the same time as with just an oil change. No leaks. 14) Test drive I basically stared at the oil pressure gauge the whole time I was driving. If the oil pressure drops, “Low oil pressure” DIC warning, or “Low oil level” DIC warning appear, immediately turn off the engine. Figure out what is wrong, call AAA, etc. Do not drive even a few feet without oil pressure. Note that the “Low oil pressure” DIC warning may appear even though the (analog) oil pressure gauge shows pressure… ignore the pressure gauge reading, the DIC warning is correct… the gauge is slow. And do not drive hard until oil temps reach 150F (which it may not do until the next step). I took 3 test drives, raised the car after each, and inspected carefully… No Leaks. 15) Build cooler radiator cover for street use Using 2 thin sheets of stainless steel (hardware store) and 1/2" packing foam, I made a cover for the front and rear of the radiator – this brings freeway cruise temps to 170. Note that using only a front cover and no foam resulted in 160F. Ultimately, I’m going to get fire-retardant foam.   16) That’s it… UPDATEThere are a few differences from the above process thanks to DreaminHere is the Z06 oil temp sensor: gold fitting in 'oil cooler' port, above oil filter:  Here is the port removed, with sensor in place:  Here is the CTS-V 'oil cooler' port  It appears the oil temp sensor is on the other side of the V's oil pan:  |